


Perfectly imperfect, floral clay hanging decorations.
- Michelle Rushton

- Sep 6, 2025
- 4 min read
Updated: Sep 14, 2025
Floral clay hanging decorations - what a wonderful way of preserving the imprint of nature, when the leaf or flower is at it's most majestic, a moment in time captured forever.
This craft blog looks at how I created air dry clay decorations, using real floral imprints ... with a splash of trial and error!
Made with love, nature and children ... not perfection (although entirely perfect to me).


One of my favourite pastimes with the children is strolling through our garden and collecting tiny treasures of nature. Pine cones that have fallen from the trees, feathers that lay in waiting to be discovered on the lawn, and small leaves or flowers too spectacular to ignore.
Fear not though discerning reader, we only take a small amount, as we adore nature and do not want to deprive any species from their food or home making materials.
The pine cones and feathers have been gathered over many years in our home, they adorn our hallway in baskets and bowls, however, the tiny leaves and flowers sadly do not last and swiftly perish.
This led me to consider alternative options. Pressing - we already enjoyed this hobby and used the pressings to decorate cards ... however, we had never tried pressing fresh flowers and leaves into clay before.
So, we tried, and we got it wrong at first - however, the children taught me about the beauty of the 'so called' imperfection and wanted to keep their ornaments, which now proudly hang in my office.
This is how it went, and how to try yourself, with some tips along the way, to help you avoid making our mistakes.
Step 1

When gathering your treasures of nature, consider the size of the ornament you wish to make, and select accordingly. Make sure they are clean and free of any debris that may embed itself in your clay.
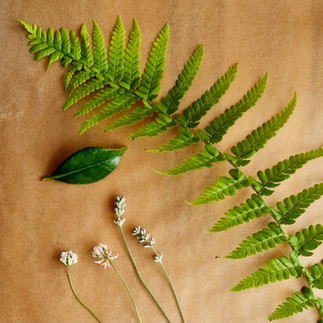
We chose flowers such as lavender, and interesting leaves we hoped would make a strong impression.
Step 2

We used Air Dry White Clay from Hobbycraft. Top Tip - have a glass of water close by for if the clay starts to dry out too quickly, as happened to us (it was a very hot summers day). A few drops of water quickly stop it feeling like a rhinoceros bottom (disclaimer - I have never actually felt a rhinoceros bottom).
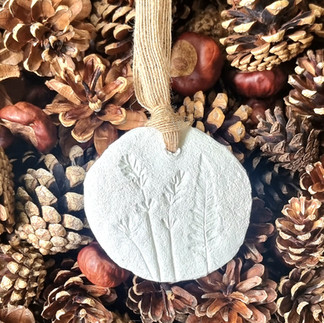
Roll or press (whichever you prefer) a small portion of your clay to your desired thickness. The children enjoyed this part, and as you can see above, they went for a rustic look.
Lightly lay your treasures on top of your clay, moving them around until you discover your preferred layout. Top Tip - have your cutter to hand, and keep the layout within its perimeter to avoid chopping part of your prettiest imprint off.
Step 3

Now this is where we went wrong. Firstly we lay a sheet of baking paper over our flowers /clay and used a rolling pin to press the flowers in. Yes, it pressed the flowers in, however, it also pressed creases from the paper into our clay.
Therefore, for our second attempt (shown in photo) we opted for using a tool to gently press the flowers in, and we wanted to add some texture to the clay, so pressed a sponge over the top. Once all flowers had been suitably pressed, we carefully peeled them off using their stalks first to gently lift off, revealing their glorious imprints underneath.
Step 4

While the clay is still wet, use a tool to make a hole in the top, then leave somewhere (preferably warm and not damp) flat on baking paper to air dry.
Drying did not take long for us, as we were in the throws of a hot summer, so overnight was enough. Once our ornaments were completely dry we chose ribbons to adorn them and hang up with pride.

Comments